PWAs with Angular - Part 2: Building a Progressive Web App

In my previous article, PWAs with Angular - Part 1: Understanding Service Worker, I walked through how to build a simple offline application using plain JavaScript and Service Worker. I recommend reading this as a prerequisite for learning to build PWAs.
Today I will talk about the key features of Progressive Web Apps, as well as how to build a Progressive Web App using Angular, and the tools that we can use to help acheive this. We will build a very simple Angular app, and then do the work necessary to transform it into a PWA.
What is a PWA
PWAs are applications which run in the browser, but also give the user the option to add the application to their home screen on mobile and tablet - much like a traditional mobile app. They also provide a partially or fully offline experience by caching files using Service Worker and serving up these files when the user is offline.
The key features of a PWA can be summed up as follows:
-
Installable - when the user visits the app in the browser on their phone or tablet, they get the option to add it to their home screen where it then remains - much like a native app installed from the app store.
-
Offline - PWAs use Service Worker to provide some level of offline functionality. This may range from a custom offline screen when the network is unavailable, to a full offline experience involving more in depth techniques such as caching data from an API (which I will talk about later in this article).
-
Push notifications - PWAs can send push notifications to the user (this is currently possible on desktop and on Android devices, but not on iOS).
-
Indexable - unlike native apps, PWAs do not appear in an app store and are simply indexable/searchable, much like websites.
-
Responsive - As PWAs are intended to work as mobile, tablet and desktop applications, they must work well across a large range of screen sizes.
-
Safe - PWAs are always served over HTTPS which ensures that the content has not been tampered with.
When to choose a PWA
Some use cases are better suited to PWAs than others. You may want to choose a PWA based solution when:
- You want to target Android, iOS and the browser - while many businesses develop a web application, an Android application and an iOS application for their product, this means maintaining 3 different codebases written in different programming languages. By choosing instead to develop a PWA, we avoid this problem and develop and maintain only a single codebase for an app which works in the browser, on Android, and on iOS.
However, you may not want to choose a PWA as a solution when:
-
You want to support push notifications on iOS - unlike native iOS apps, PWAs cannot currently send push notifications in iOS.
-
You want your app to appear in Android and iOS app stores - although PWAs are indexable so appear in search engine results, they cannot be added to the Android or iOS app stores.
Building the app
First we will build a simple Angular 7 app which, which we will later transform into a PWA. The source code for the finished application is available here.
ng new pwa-tutorial --style=scss
Next, create a folder named models inside of your app folder and add a file named todo.ts:
export interface Todo {
  id: string;
  title: string;
  completed: boolean;
}
For the next step, we are going to use the Angular HttpClient module, so import this inside of app.module.ts.
Create a folder named services, and inside of this add a file named todo-data.service.ts and add the following:
import { HttpClient } from '@angular/common/http';
import { Injectable } from '@angular/core';
import { Observable } from 'rxjs';
import { Todo } from '../models/todo';

@Injectable({
  providedIn: 'root'
})
export class TodoDataService {

  constructor(private http: HttpClient) { }

  fetchTodos(): Observable<Todo[]> {
    return this.http.get<Todo[]>('https://jsonplaceholder.typicode.com/todos?userId=1');
  }
}
This is a service which fetches some Todo items from an API endpoint. We are using JSONPlaceholder, which is a free API that provides endpoints for fetching a number of different types of dummy data - perfect for the purpose of this tutorial! In the above we are fetching all the Todo items belonging to the user with a userId of 1.
Now we can bring all of this together in our app component. Inside of app.component.ts we make our Todo items available to the template:
import { Component, OnInit } from '@angular/core';

import { Observable } from 'rxjs';
import { Todo } from './models/todo';
import { TodoDataService } from './services/todo-data.service';

@Component({
  selector: 'app-root',
  templateUrl: './app.component.html',
  styleUrls: ['./app.component.scss']
})
export class AppComponent implements OnInit {

  todos$: Observable<Todo[]>

  constructor(private todoDataService: TodoDataService) {}

  ngOnInit() {
    this.todos$ = this.todoDataService.fetchTodos();
  }
}
Inside of app.component.html we subscribe to todos$ implicitely using the async pipe, and display them in a list.
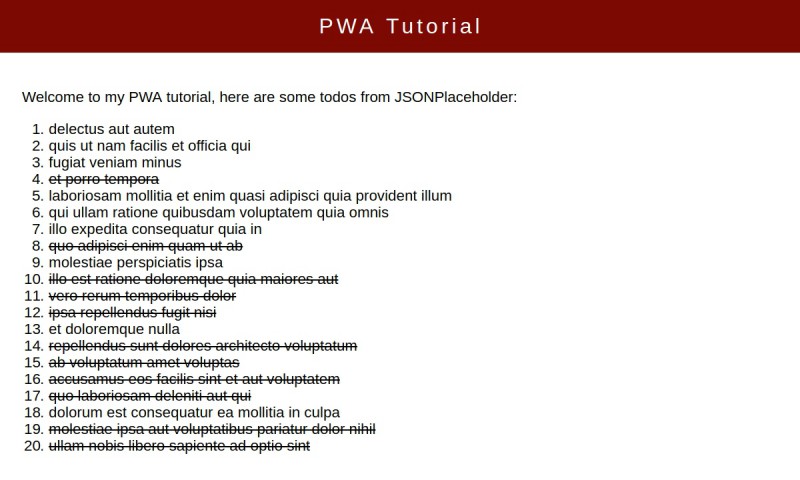
<header>
  <h1>PWA Tutorial</h1>
</header>
<main>
  <p>Welcome to my PWA tutorial, here are some todos from JSONPlaceholder:</p>
  <ul>
    <li *ngFor="let todo of todos$ | async"></li>
  </ul>
</main>
<footer>
  © Will Taylor 2019
</footer>
And finally, inside of app.component.scss, we add some basic styles just to make our app look a bit better!
:host {
  font-family: 'Arial';
}

header {
  height: 5rem;

  h1 {
    margin: 0;
    padding-top: 1.4rem;
    text-align: center;
    font-weight: normal;
    letter-spacing: 5px;
  }
}

main {
  font-size: 1.4rem;
  padding: 2rem 3rem;

  .completed {
    text-decoration: line-through;
  }
}

footer {
  position: fixed;
  bottom: 0;

  width: 100%;
  padding: 1rem 3rem;
}

header, footer {
  background: #7c0A02;
  color: #ffffff;
}
In addition to these styles, we will add normalize-scss.
npm install normalize-scss -P
Then inside of styles.scss:
@import '../node_modules/normalize-scss/sass/normalize/import-now';
Now the initial implementation of our app is complete!
Auditing the app using Lighthouse
Lighthouse is an open source tool for auditing web application for a number of things, including Progressive Web App features. We will use Lighthouse to audit our app.
With the application running in Chrome, we can now open up the ‘Audits’ tab in the devtools, and click ‘Perform an audit’ to audit the application… Sadly, after doing this we see our application only scores 19/100 for PWA functionality.
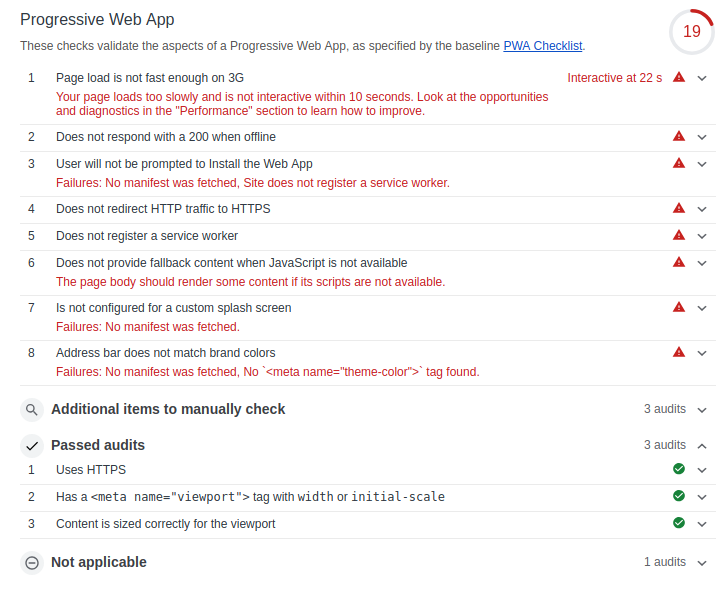
So, what is causing it to fail the audit and how can we address these problems? Firstly, “Page load is not fast enough on 3g” is to do with the fact that we audited a dev build and none of the files have gone through optimisation such as minification. “Does not redirect HTTP traffic to HTTPS” is due to the fact that we are running the app on localhost right now.
But what about the other problems?
-
Does not respond with a 200 when offline
We need to use Service Worker to cache the app’s static files, and in some cases api endpoint responses, to display something to the user when the app is offline.
-
User will not be prompted to install the Web App
We need to add a manifest file in order for this to happen.
-
Does not register a Service Worker
We need to register a Service worker in order to provide offline functionality.
-
Does not provide fallback content when JavaScript is not available.
We need to add a
<noscript>tag to display something to any users who do not have JavaScript enabled. -
Is not configured for a custom splash screen
We will need to add a manifest file and configure this.
-
Address bar does not match brand colors
We will need to add a manifest file and configure this.
Transforming our app into a PWA
Angular provides some tools which we will use for adding PWA functionality to your app.
ng add @angular/pwa
This command will add and install @angular/service-worker and @angular/pwa. It will make the following changes to the app:
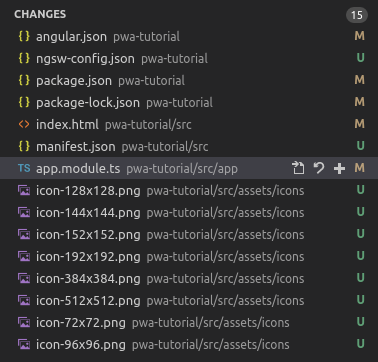
Manifest file
We can see that there is a manifest.json file in the root of the project. This file is what allows the app to be added to the user’s home screen on Android and iOS, and it is where we can configure how the app behaves when installed in this way. This files includes things such ash as the app name, the colors to use for the splash screen and UI elements such as the address bar, and the icons used for the app. Note that Angular has also added an icon for the app, at the multiple different resolutions required for different contexts.
A full explanation of the properties which can be used in the manifest file is available here.
Service Worker
Another file, ngsw-config.json, has also been added to the root folder of our project. This is not our Service Worker, but the configuration file for a Service Worker - Angular does not expose the actual Service Worker itself by default. However, it is very useful to understand what a Service Worker is and how it behaves in order to easily debug PWAs.
Inside of ngsw-config.json we see that first of all there is an index field, which simple points to the location of index.html. Next, there is an assetGroups field - this contains an array of groups of files we wish to cache, and the strategy we want to use for fetching and caching them.
{
    "name": "app",
    "installMode": "prefetch",
    "resources": {
        "files": [
            "/favicon.ico",
            "/index.html",
            "/*.css",
            "/*.js"
        ]
    }
}
The above group targets the .html, .css and .js files which make up our app, plus the favicon.ico. The installMode of prefetch tells Angular to download and cache all of these files the first time that the user loads the app and the Service Worker gets installed - as you can imagine, this is bandwidth intensive.
{
    "name": "assets",
    "installMode": "lazy",
    "updateMode": "prefetch",
    "resources": {
        "files": [
            "/assets/**"
        ]
    }
}
This group targets the app’s assets such as images and fonts - a different caching strategy is used here. The installMode is set to lazy, meaning that a file is not cached until a request for that file is made. The updateMode is set to lazy, meaning that when the app gets updated, if a file which has already been cached was modified in the update, the file will be fetched and cached immediately. This makes sense, as, for example, if we updated an image at a particular path in our app, we would not want the user then seeing the old version of that image.
Inside of app.module.ts we can see that Angular has added a line to register the Service Worker - note that this only happpens in the production environment (we wouldn’t ever want to cache files during development).
ServiceWorkerModule.register('ngsw-worker.js', { enabled: environment.production })
Updates to index.html
<no-script>tags have been added to inform the user that they must enable JavaScript to use the site.- A
<link>tag tomanifest.jsonhas been added. - A tag has been added to specify the
theme-color- this is used to style the browser address bar.
Second audit
After simply adding the out of the box Angular PWA functionality, lets see how the app performs in a second audit. For our app to be able to install a Service Worker, we must do a production build and then run a HTTP server in our app’s dist folder rather than just using ng serve.
Firstly, lets install http-server globally:
npm i http-server -g
Now to build and serve the app:
ng build --prod
cd dist/pwa-tutorial
When we run the audit again, we see that the app scores 92/100 for PWA - this is great! The only criteria on which it fails is serving over HTTPS - this is something which we do not need to worry about during development and should be dealt with at deployment time.
There are also some other manual checks mentioned, such as making sure each page has a URL, and that the app runs in all browsers (although the app won’t work offline in Internet Explorer as it is not supported). This is the case for our app, so for all intents and purposes it has passed the audit!
Caching API responses
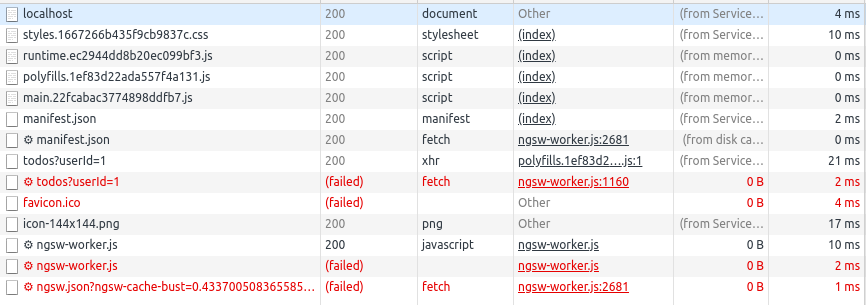
Now lets go into the network tab and set the app to offline mode. When we refresh the app we see the following:
The static assets for the app are loading, which is a great first step, but the Todo data from the API is not. Luckily, the ngsw-config.json file allows us to specify dataGroups, allowing us to cache API responses.
JSON Placeholder Data Group
Inside of ngsw-config.json, below assetGroups we add a new field, dataGroups:
 "dataGroups": [
    {
      "name": "Todos",
      "urls": ["https://jsonplaceholder.typicode.com/todos"],
      "cacheConfig": {
        "maxSize": 10,
        "maxAge": "7d",
        "timeout": "10s",
        "strategy": "freshness"
      }
    }
  ]
This tells our app to cache responses from the JSONPlaceholder /todos endpoint and its subdomains, eg. /todos/1 and to only respond with cached results if the network is unavailable.
maxSizedenotes the maximum number of responses from this endpoint which should be cached.maxAgedefines how long responses should be cached for.timeoutdefines after how long the Service Worker should attempt to fetch a response from the network before timing out and responding with cached results.strategydefines whether the Service Worker should attempt to fetch from the network first (freshness) or respond with cached results first if they are available (performance).
The full documentation for this is available here.
If we build the app again and run http-server, we can open the app in the browser and install and activate the updated Service Worker (you may be required to navigate away from the page and then back again to activate the new Service Worker). We now see that if we set the app to offline mode in the Chrome devtools network tab and refresh the page, the app is loading with the cached Todos.
Further steps - Background Sync and Push Notifications
There are other features of Service Worker we can use to implement further offline and native like functionality for our app, which I will not cover in depth here.
-
Lets say we wanted to allow the user to add
Todoswhile offline, and then POST them to an api endpoint in the background when the device comes back online. This is now possible with background sync (currently Chrome only). -
If we want to send push notifications, even while the user does not have the application open, this is also possible with Service Worker (Android only).
