A complete guide to Angular libraries

One of the things that was introduced in Angular 6 was the ability to create and build libraries with the Angular CLI.
When I first used this feature I was delighted at how simple it was, as while it was technically possible to create libraries using earlier versions of Angular, it was an altogether frustrating and saddening experience.
In this article, I will walk you the key elements of developing Angular libraries:
- Common use cases for Angular libraries.
- Creating a library using the Angular CLI.
- Speeding up development of Angular libraries with npm link.
- Publishing your library.
The full demo code for the library which we create can be found here.
Use cases for Angular libraries
From my experience, there are 2 common use cases for Angular libraries:
- Building a reusable component library for sharing between applications.
- Building shared service layer functionality - eg. a client for working with an external data source such as an API.
While there are lots of cases where an Angular library is a good fit for a project, it is worth considering whether your use case is one these, as it does introduce some maintenance overhead. Remember, you can always write functionality as part of a shared Angular module within your application and extract it out into a library when necessary.
Creating an Angular library project
We will create an Angular library, as well as a demo application to consume this library. We can create these with the following commands:
ng new example-component-library --create-application=false
cd example-component-library
ng generate library example-component-library
ng generate application example-component-library-app
Using the --create-application=false flag prevents Angular from creating an application with the name ‘example-component-library’, which is the name we want to give to the library itself and not the test application, as explained here.
If we now look inside of the workspace which we just created, we can see that there is a projects folder containing a sub folder for each of the library (example-component-library) and the application (example-component-library-app) which we just generated. There is also a third folder containing an e2e test project, which we can ignore.
Lets now build our library and see what happens:
ng build --project=example-component-library
If we look in the dist folder, we will see that our library has been built and that inside of the build folder we have a number of different folders containing the application in various different module formats suitable for different consumers, as well as a folder containing TypeScript definitions.
- bundles - UMD module format.
- esm5 - module format which uses mostly es5, but also the import/export syntax from es6.
- esm2015 - module format which uses es2015/es6.
- fesm5 - flattened version of esm5.
- fesm2015 - flattened version of
peerDependenciesesm2015. - lib - TypeScript definitions for the library.
This format is called Angular Package Format, and it is the format used as the output of ng-packagr, the tool which Angular CLI uses to transpile libraries.
Structuring your Angular library project
The contents of the library currently look like this:
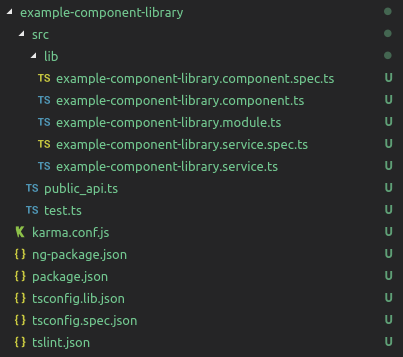
First, delete the existing example-component-library module, component and service files - we do not need these.
Next we will add a component, a pipe and a directive. We will follow a pattern of adding one component per module - this will allow a consuming application to import only the modules of the library which it is interested in, and then for all other modules to be tree shaken during the build process. I highly recommend doing this, as it will really make a difference to the size of your application bundles as the library grows.
ng generate module components/foo
ng generate component components/foo
ng generate module pipes/bar
ng generate pipe pipes/bar/bar
ng generate module directives/baz
ng generate directive directives/baz/baz
After doing this our library should have the following folder structure:
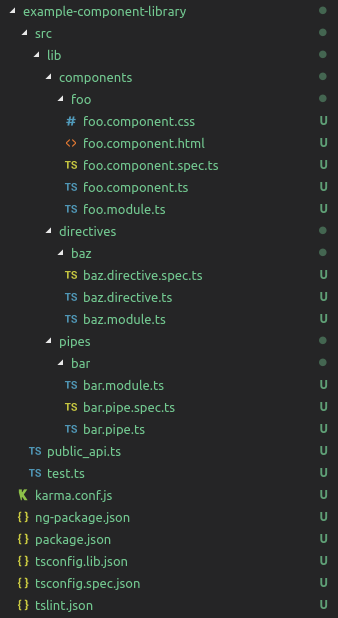
Of course this structure can be adjusted based on you or your team’s preference, but the important things to keep in mind are:
-
Have one component per module to allow for tree shaking of the unused modules/components.
The exception to this is components which are always used together should be kept in the same module - eg. If you were implementing tabs, a TabGroupComponent and TabItemComponent would live in the same module.
-
Try to avoid or limit using barrel imports within an Angular library
In Angular 6 there are issues with barrel imports in libraries and the Angular AOT build. These issues seem to be fixed in Angular 7, but I still regularly run into confusing issues due to barrel imports and so support this recommendation of using only 1 level of barrel imports (or just avoiding them entirely).
Next we must add each of the components we created to the exports of its module:
import { CommonModule } from '@angular/common';
import { FooComponent } from './foo.component';
import { NgModule } from '@angular/core';

@NgModule({
  declarations: [FooComponent],
  imports: [
    CommonModule
  ],
  exports: [FooComponent]
})
export class FooModule { }
We now update public_api.ts to export any files in the library that we wish to expose to a consuming application:
/*
 * Public API Surface of example-component-library
 */

export * from './lib/components/foo/foo.module';
export * from './lib/components/foo/foo.component';

export * from './lib/pipes/bar/bar.module';
export * from './lib/pipes/bar/bar.pipe';

export * from './lib/directives/baz/baz.module';
export * from './lib/directives/baz/baz.directive';
Now all we have to do is rebuild the library, and it will be ready to consume the library from an application.
ng build --project=example-component-library
Consuming our Angular library
In Development
During development the best way to consume our library is using npm link. This will allow us to symlink from a directory in our consuming application’s node modules folder to the compiled application in the library’s dist folder.
cd dist/example-component-library
npm link
We can link an Angular project to this library from anywhere on our local machine. From the project root folder:
npm link example-component-library
If we now run the library with the watch flag, and at the same time run ng serve in another terminal window.
ng build --project=example-component-library
ng serve
This will allow us to develop an application and (one or more) linked libraries simultaneously, and see the app recompile with each modification to the library’s source code.
In Production
For production, we will publish our library to npm, and then have it installed into the application using npm install.
First, you will need to create an npm account. Now login from the command line:
npm login
From the project root folder:
cd dist/example-component-library
npm publish
Our package is now published on npm (publicly), and we can install it by adding it to our application’s package.json dependencies and running npm install:
"dependencies": {
    ...
    "example-component-library": "~0.0.1"
}
Library dependencies
If your library has dependencies, then these should be specified as either dependencies or peerDependencies in the package.json of your library itself (and not the package.json in the root of the project). For example, in the case of our simple library, we just have the following dependencies:
"peerDependencies": {
    "@angular/common": "^7.1.0",
    "@angular/core": "^7.1.0"
}
Angular is specified as a peerDependency rather than a dependency in order to avoid having the consuming application install multiple, conflicting versions of Angular. This article has some good information on peerDependencies and when to use them.
Conclusion
We have seen how we can create an Angular component library which can be consumed by multiple different Angular applications, as well as how we can work with libraries in development and publish them for production. Below I have listed the resources I have found useful for learning about Angular libraries myself, and for writing this article.